Posts

Showing posts from May, 2017

DOX X & Y Endstops

Image
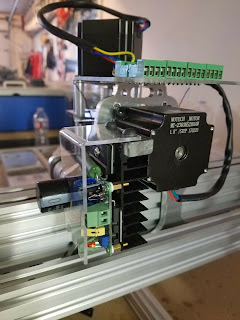
Background This bracket is intended to be a "Universal" bracket for mounting micro switches as end-stops on my OX Installation On the gantry  On the side plate  SU Model Notes on the bracket I drilled out the switch to accept #4 sheet metal screws. Be careful not to damage the switch Microswitch:  https://www.amazon.com/gp/product/B00MFRMFS6/ref=oh_aui_search_detailpage?ie=UTF8&psc=1 The bracket was made from .22 acrylic The slot accepts a 5mm screw.

Building a Table for the Ox

Image
The DOX (Don's OX) Table Build Finally all CNC's in one place in my shop. Both laser and Router are on movable bases Goals: Strong  Sits on the floor when in operation but can be moved easily Houses electronics Room for a hood added at a later time Space for electronics Design: Materials: dimensional lumber from big box stores 3/4" MDF thick top Integrated lift: lifts entire table up on casters for movement Storage space  Space for drawers, electronics, PC or tablet General Parts Frame parts: 2x4 and 2x6, 96" length Cam lags: 1/2 x 6" and flat washer. Most other hardware: 1/4 x 5" lag screws and washers Top: 3/4 MDF, size to your liking Shelf: 1/4" fiber board or material to your liking A rough cut-list for the V3 model below Initial Build Complete The table cut and kitted 1/2 x 6" lag screws in cams 1/2 x 6" lags were used in the cams so that the non threaded part of the shaft crea

Wiring the OX

Image
Wiring Phase & Diagrams I like to start the wiring phase with a schematic of the overall build interconnections. These are helpful starter links; TinyG "Getting Started" LitePlacer's blog Wiring Cable routing Wiring Schematic (a work in progress) Endstop Wiring From the Synthetos forum: Wire the limit switches between the ground and the switch inout – e.g. Xmin, Xmax, Ymin… Note if the switch is Normally Open (NO) or Normally Closed (NC) and set the $st setting for the proper switch type. All switches must be the same type. We recommend NC switches as they provide better noise immunity from false triggers. You will want to pay attention to switch wiring, as the wiring can pick up noise and fire if not done well. The RC circuits described above help a lot, but motor or spindle noise can creep in. The best strategy is to use twisted pair shielded cable. I have found guitar pickup cable to work well as it is all that plus it’s very small and fl

Getting Started in CNC

Enter the CNC Router For the past few years and prior to my retirement I have been on a journey to build up an automated shop. One that would enable me to build anything that I could imagine. Along with virtually every tool you could imagine I have a 3D printer and a converted laser cutter and engraver, ( The K40-S ). My last (really?) big automated tool investment is a CNC router. This bog will capture my new journey in the CNC router space.  What Router Should I Get? I have been watching the CNC communities for some time and now that my K40-S is almost complete I decided to purchase a CNC router. In addition my Dad is visiting me and I thought it would be fun to build it with him, at least that's my excuse for exposing myself to another time and money sink while the last one (K40-S) is not quite done. I also decided to build from a kit this time with hopes that is would shorten the research effort and the time to complete. You see my K40-S took a year to get to its

The Oxcellent Adventure Begins

Image
Ready-Set-BUILD My OX arrived from SMW3D today. SMW3D has been great! Extremely responsive, replaced a damaged part, answer all my questions and provide sound advice. I would recommend their this kit. Shipping, Packaging, Un-boxing and Inspection Whoops.... SMW3D is on it! Documentation The unit came with illustrated step-by step instructions  Observations: 1. Don't pull stuff out of the individual bags no mater how curious you are! The bags are nicely labeled by the steps that they pertain to. Pulling out the parts upsets the build sequence and will cause you to loose track of what parts go where. The documentation gives you an inventory of parts for each step enabling you to get them back in the right bag. Online help: This site is invaluable. http://www.openbuilds.com/builds/openbuilds-ox-cnc-machine.341/ I highly recommend downloading the SketchUp model to use as a reference. The parts are not exactly the same as the kit but it provides a great